Root twrp For Galaxy A7 2016-
twrp Recovery and Rooting Guide is Now available for Galaxy A7 2016, you can Download and Install this Recovery on your Galaxy A7 2016 by following Bellow Guide,

twrp Recovery and Rooting Guide is Now available for Galaxy A7 2016, you can Download and Install this Recovery on your Galaxy A7 2016 by following Bellow Guide,

this IS a Latest working twrp Recovery and Root Guide for Galaxy A7 2016 SM-a700FD, and today we Will Show you How you can Download and Install This Recovery on your Galaxy A7 2016, the Recovery come in tar format so you can easily flash the Recovery via odin, after flashing the Recovery you can Root your Galaxy A7 2016 by flashing latest supersu.zip file, Rooting may cause bootloop in some devices with stock boot.img, but you can still take a backup to recover this Condition when you got bootloop or Related, Follow Bellow Guide to install twrp recovery and Root Galaxy A7 2016,
Requirements To Root Galaxy A7 2016-
Note-
- Rooting will void your phone warranty, and you won’t claim it back.
- Follow the steps correctly otherwise you may brick your device. We are not responsible for any damage of your phone.
- It will erase all your phone data, so we advise you first to take a complete backup of your phone and then proceed.
- Ensure that your phone has at least 50-60% charged to prevent the accidental shutdown in-between the process.
Steps to Install TWRP Recovery and Root Galaxy j3 2016 –
Step-1) First, enable ‘USB debugging’ and ‘OEM Unlock’ option from setting>developer option>. To enable Developer Options, go to About phone and tap the Build Number 7 times.
Step-1) First, enable ‘USB debugging’ and ‘OEM Unlock’ option from setting>developer option>. To enable Developer Options, go to About phone and tap the Build Number 7 times.
Step-2) Now download the Latest TWRP Recovery for your device.
Step-3) Now Download the Odin tool from above and extract the zip file.
Step-4) Run the Odin_v3.10.7.exe file on your PC.
Step-5) Connect your Galaxy to your PC with the data cable and reboot into the Download/Odin mode.
Step-6) To enter into download mode turn off your phone and press and hold the ‘Home + Volume Down + Power’ buttons together until you see the download mode screen.
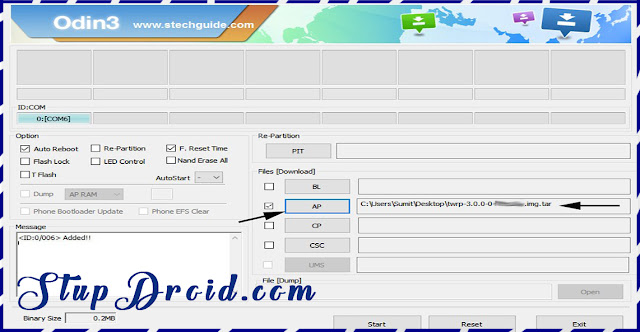
Step-7) Once you enter into Download mode, you see anID: COM port turned blue and Added message in Odin message box means your device has recognized by Odin.
Step-8) If ID: COM doesn’t show means your driver is not correctly installed or try it with different USB cable.
Step-9) Now locate and add the twrp--xxx.img.tar file (you downloaded from above) to the AP/PDA tab in Odin.
Step-10) Make sure that only these two options are tick “Auto Reboot” and “F.Reset Time“
Step-11) Now click ‘Start‘ button and it will start flashing the file. Wait until you see ‘Pass‘ in Green Color on Odin screen. This step will Install TWRP Recovery On Samsung,
12) Now Your device will automatically reboot. That’s it. You Install TWRP Recovery on Galaxy A7 2016 successfully.
Root Galaxy A7 2016–
- Step-1) To Root Galaxy A7 2016 first, download the SuperSu from above.
- Step-2) Now save the SuperSu zip file to your phone.
- Step-3) Boot your device into Recovery mode mode.
- Step-4) In TWRP recovery navigate to Install Zip and select ‘SuperSu.zip’ to root Galaxy j3 2016 Pro.
- Step-5) Swipe to install SuperSu and reboot your device. That’s it, you root Galaxy A7 2016 successfully.
this is the complete guide of how to Root and Install TWRP Recovery on Galaxy A7 2016 with easy steps. If you have any questions, then comment below.
Search tag-
root Galaxy A7 2016, twrp for Galaxy A7 2016 SM-a700FD, flash file for Galaxy A7 2016, firmware for Galaxy A7 2016, latest twrp for Galaxy A7 2016, root myGalaxy A7 2016, rooting guide for vGalaxy A7 2016, cara root Galaxy A7 2016, como rooter Galaxy A7 2016 rooting step for Galaxy A7 2016, step by step root Galaxy A7 2016,


ConversionConversion EmoticonEmoticon