Root twrp For Gionee P7-
Root Guide for Gionee P7 is now available which is experimental, follow Bellow Guide to install twrp recovery and Root Gionee P7,

Note- twrp Not available for this Device,come back later, use flashfire at this time,
Root Guide for Gionee P7 is now available which is experimental, follow Bellow Guide to install twrp recovery and Root Gionee P7,

install twrp Custom Recoevery and Root Gionee P7, today we Will Show you how to install twrp Custom Recovery and Root Gionee P7,Gionee P7 is a mid range Smartphone comes with a 5.00-inch touchscreen display with a resolution of 720 pixels by 1280 pixels. Gionee P7 price in India starts from Rs. 10,400. The Gionee P7 is Run on Android 6.0 OS powered by 1.3GHz quad-core it comes with 2GB of RAM. The phone packs 16GB of internal storage that can be expanded up to 128GB via a microSD card. As far as the cameras are concerned, the Gionee P7 packs a 8-megapixel primary camera on the rear and a 5-megapixel front shooter for selfies. The Gionee P7 is a dual SIM smartphone that accepts . Connectivity options include Wi-Fi, GPS, FM and 4G (with support for Band 40 used by some LTE networks in India). Sensors on the phone include Proximity sensor, Accelerometer and Ambient light sensor.
Note:- - This ROM/Recovery is work on Listed Device only. Don’t try this on any other device.otherwise it cause bootloop,
- This is the stable version of Rom/Recovery.
- Follow the steps correctly otherwise you may brick your device. We are not responsible for any damage to your phone.
- It will erase all your data, so we advise you first to take a complete backup of your phone and then proceed.
- Ensure that your phone has at least 50-60% charged to prevent the accidental shutdown in-between the process.
- How to Repair IMEI Number on Android Devices
- Backup Stock Rom on Android without Recovery
- How to Increase Internet Speed[also network signal] On Android Devices
- Root Tools apk from official site
- if This version Field try old version,
- flshfire twrp alternative to flash zip and Rom
- twrp not available at this time,
- xposed framework From here
How to Root Gionee P7-
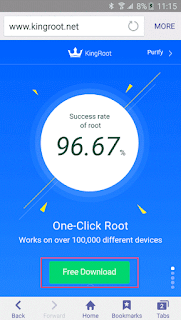
Step 1: Enter your phone's browser: www.kingroot.net Click Free Download download KingRoot
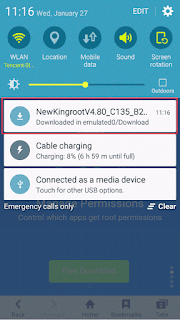
Step 2: After KingRoot download is complete, click on the drop-down notification bar to installation
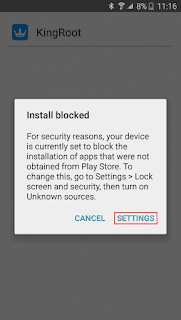
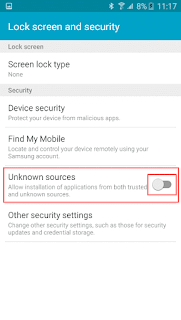
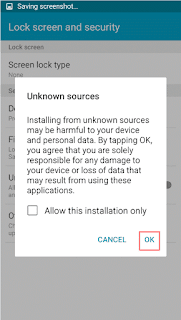
Step 3: If you have not been set before "install blocked", will set a reminder, as the steps in the following figure, if you have set up before, skip this step,direct to Step 4
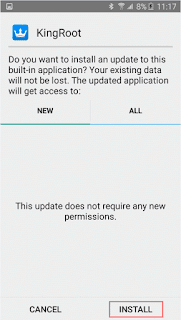
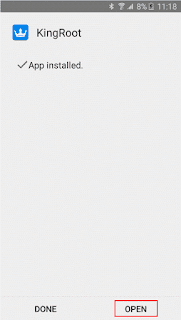
Step 4: In the System installation screen, click "install" to start the installation, when the installation is complete, click on the "open" button to start using KingRoot
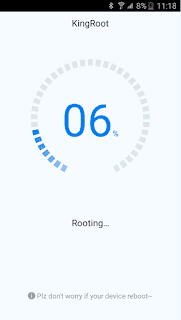
Step 5: Click "try it" to enter the main interface, and click "get now" button to start rooting

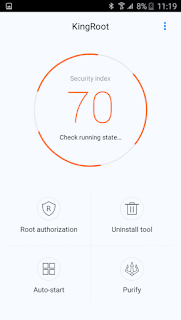
Step 6: The implementation process is completed and finished, after that you will be return to the main screen, then the Rooting is done.
Step 7: Finally go to google play search and Download: Root Checker to Check the Root is successful, as the following figure which represents success,

So This Is The complete Guide To Root The Gionee P7 Via KingRoot ,if You face any Problem please Let us know Via Comment,Step 1: Enter your phone's browser: www.kingroot.net Click Free Download download KingRoot

Step 2: After KingRoot download is complete, click on the drop-down notification bar to installation

Step 3: If you have not been set before "install blocked", will set a reminder, as the steps in the following figure, if you have set up before, skip this step,direct to Step 4


Step 4: In the System installation screen, click "install" to start the installation, when the installation is complete, click on the "open" button to start using KingRoot


Step 5: Click "try it" to enter the main interface, and click "get now" button to start rooting


Step 6: The implementation process is completed and finished, after that you will be return to the main screen, then the Rooting is done.

Step 7: Finally go to google play search and Download: Root Checker to Check the Root is successful, as the following figure which represents success,

Note- twrp Not available for this Device,come back later, use flashfire at this time,
Search tag-
root Gionee P7 twep Gionee P7, root guide for Gionee P7 cara root Gionee P7 rooten Gionee P7, root myGionee P7, step by step root Gionee P7, cara rooten Gionee P7 como rooten Gionee P7, root steps for Gionee P7 rooting guide for Gionee P7, how to root Gionee P7, custom recovery for Gionee P7 recovery installation,
Download Your Favorite Mod Full Android Application And Games For Free In Here.Thanks for coming to this site and If you like our post please share and like this page to your friends. Any question please tell us in the comment section.
ConversionConversion EmoticonEmoticon