Stock Rom For Galaxy j7 Prime 2016-
Download and Install stock firmware On Samsung Galaxy j7 Pro, Today I will Show you How to Install Stock rom on Samsung Galalxy j7 Prime 2016 version,

Requirements-
odin
Samsung Driver
Stock Rom-
SM-J710F Here
SM-J710GN Here
SM-J710K/L/S Here
Steps To Install Stock Rom On Samsung Galaxy j7 Prime-
1) First enable USB debugging and OEM Unlock from setting>developer option>. To enable Developer Options, go to About phone and tap the Build Number 7 times.
2) Now download stock firmware from above
3) Now Download the Odin tool from above and extract the zip file.
4) Run the Odin_v3.10.7.exe file on your PC.
5) Connect your Galaxy j7 Prime to your PC with the data cable and reboot into the Download/Odin mod
6) To enter into download mode turn off your phone and press and hold the ‘Home + Volume Down + Power’ buttons together until you see the download mode screen.
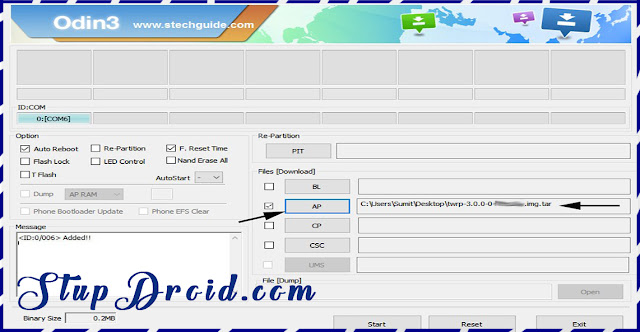
7) Once you enter into Download mode, you see an ID: COM port turned blue and Added message in Odin message box means your device has recognized by Odin.
8) If ID: COM doesn’t show means your driver is not correctly installed or try it with different USB cable.
9) Now locate and add the Rom.tar.md5 file (you downloaded from above) to the AP/PDA tab in Odin.

10) Make sure that only these two options are tick “Auto Reboot” and “F.Reset Time“
11) Now click ‘Start‘ button and it will start flashing the file. Wait until you see ‘Pass‘ in Green Color on Odin screen. This step will install stock rom on your Device.

12) Now boot your device into the recovery mode by pressing and holding ‘Home + Volume Up + Power‘ buttons for few seconds.
This Is the complete guide to Install Stock Rom On Samsung Galaxy j7 Prime, if you face any problem put you comment.
Search Tag-
Download and Install stock firmware On Samsung Galaxy j7 Pro, Today I will Show you How to Install Stock rom on Samsung Galalxy j7 Prime 2016 version,

Samsung Galaxy j7 Prime smartphone was launched in July 2016. The phone comes with a 5.50-inch touchscreen display with a resolution of 720 pixels by 1280 pixels.The Samsung Galaxy j7 Pro is Run On Android 6.0 OS powered by 1.2GHz quad-core and it comes with 2GB of RAM. The phone packs 16GB of internal storage that can be expanded up to 128GB via a microSD card. As far as the cameras are concerned, the Samsung Galaxy j7 Pro packs a 13-megapixel primary camera on the rear and a 5-megapixel front shooter for selfies.
The Samsung Galaxy j7 Pro is a dual SIM (GSM and GSM) smartphone that accepts two Micro-SIM. Connectivity options include Wi-Fi, GPS, Bluetooth, FM, 3G, 4G (with support for Band 40 used by some LTE networks in India). Sensors on the phone include Proximity sensor, Ambient light sensor, Accelerometer, and Gyroscope.
The Samsung Galaxy j7 Pro is a dual SIM (GSM and GSM) smartphone that accepts two Micro-SIM. Connectivity options include Wi-Fi, GPS, Bluetooth, FM, 3G, 4G (with support for Band 40 used by some LTE networks in India). Sensors on the phone include Proximity sensor, Ambient light sensor, Accelerometer, and Gyroscope.
Requirements-
odin
Samsung Driver
Stock Rom-
SM-J710F Here
SM-J710GN Here
SM-J710K/L/S Here
Steps To Install Stock Rom On Samsung Galaxy j7 Prime-
1) First enable USB debugging and OEM Unlock from setting>developer option>. To enable Developer Options, go to About phone and tap the Build Number 7 times.
2) Now download stock firmware from above
3) Now Download the Odin tool from above and extract the zip file.
4) Run the Odin_v3.10.7.exe file on your PC.
5) Connect your Galaxy j7 Prime to your PC with the data cable and reboot into the Download/Odin mod
6) To enter into download mode turn off your phone and press and hold the ‘Home + Volume Down + Power’ buttons together until you see the download mode screen.
7) Once you enter into Download mode, you see an ID: COM port turned blue and Added message in Odin message box means your device has recognized by Odin.
8) If ID: COM doesn’t show means your driver is not correctly installed or try it with different USB cable.
9) Now locate and add the Rom.tar.md5 file (you downloaded from above) to the AP/PDA tab in Odin.

10) Make sure that only these two options are tick “Auto Reboot” and “F.Reset Time“
11) Now click ‘Start‘ button and it will start flashing the file. Wait until you see ‘Pass‘ in Green Color on Odin screen. This step will install stock rom on your Device.

12) Now boot your device into the recovery mode by pressing and holding ‘Home + Volume Up + Power‘ buttons for few seconds.
This Is the complete guide to Install Stock Rom On Samsung Galaxy j7 Prime, if you face any problem put you comment.
Search Tag-
Install stock rom Galaxy j7 Prime, download stock rom for Galaxy j7 Prime 2016, stock rom install Galaxy j7 Prime 2016, download and install stock rom on Galaxy j7 pro, Galaxy j7 Pro stock rom, Galaxy j7 Prime install stock rom on Galaxy j7 Prime, how to download and install stock rom on Galaxy j7 Prime, guide to install stock rom on Galaxy j7 Prime, stock firmware for Galaxy j7 Prime, install stock firmware on Galaxy j7 Prime,
ConversionConversion EmoticonEmoticon